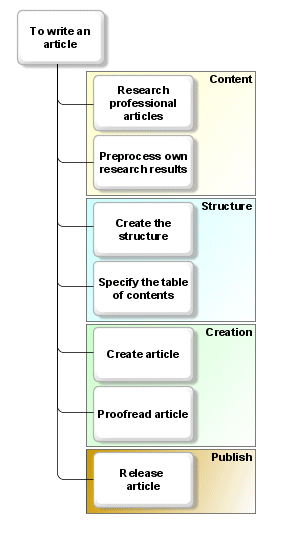
I want information at a glance. Often it helps to get a quick impression about a state to determine what needs to be done next in detail. And what is better than symbols to get a quick, reliable overview of process progress, the state of listed activities or the degree of resource utilization?
For this purpose, attribute symbols are used to display attribute values in ARIS. By the way: many attribute symbols are already available but, with ARIS Business Architect, new symbols can be added.
Using ARIS Business Architect:
If you have administration rights, you can find the attribute symbols by clicking on the "Administration" module, opening the ARIS Business Server in the navigation bar, and clicking on the plus signs in front of "Configuration/Method/Attribute symbols". The amount of symbols available should be enough to create a nice example, don't you think?
Now let's start using them.
Click on "Attribute types" and create a new attribute by clicking on the "New" button.
In the "Create attribute type" dialog choose the "User attribute values" data type and name it "Done". Select the "Very poor" symbol (![]() ) for the "Not maintained" state.
) for the "Not maintained" state.
After all, it is very poor if no state value is inserted.
Now you can add the values. Simply click on “Add” to display a new value row. Enter "Very little" and assign the "Low coverage" symbol (![]() ). In the same manner, add the values "By half" and "Completed". The first value assigned by the "Average coverage" (
). In the same manner, add the values "By half" and "Completed". The first value assigned by the "Average coverage" (![]() ) symbol, the second value assigned by the "Maximum coverage" (
) symbol, the second value assigned by the "Maximum coverage" (![]() ) symbol.
) symbol.
That's it. Then click the “OK” button to close the "Create attribute type" dialog.
Using ARIS Business Architect or ARIS Business Designer:
Now open the database to use the new attribute and its values.
Don’t forget: if you want to use the new attribute in models from a currently opened database, you need to close the database and reopen it. After logging in, the new configuration is taken over and you can assign your value attribute type.
As an example, create the “To write an article” model that is based on the “Quick model” model type:
If you haven't already done so, display the “Attribute” tab by activating the properties check box (![]() ).
).
To show the newly created “Done” attribute for the objects, select the “Research professional articles” object and in the “Attribute” tab click on the “More attributes” button. The “Insert attributes” dialog opens and you can find the “Done” attribute under “Quick model”.
Double click the “Done” attribute. The dialog is closed and the “Done” attribute is listed in the “attribute” tab.
Now, place the attribute on the objects:
- Select the subordinated objects from “Research professional articles” to “Release article”.
- Right click on the selection and choose “Format/Edit attribute placement”. The “Object properties” dialog opens with the “Attribute placement (objects)” page opens.
- Click on the “Add” button. The “Add attributes” dialog opens.
- Double click on the “Done” attribute in the “Add attributes” dialog. The dialog is closed and the new attribute is listed in the “Placed attributes” field.
- In the placement field, activate the middle right check box. There, the “Done” attribute will be placed in the model.
- Activate the “As symbol” check box in the “Representation” group box.
- Close the “Object properties” dialog by clicking on “OK”.
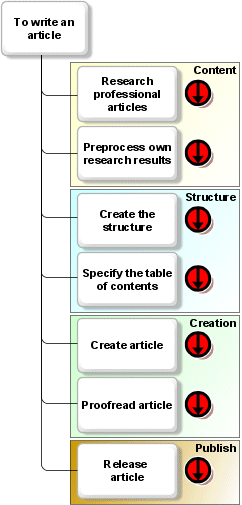
The "Very poor" symbols are immediately placed because you haven't added attribute values yet:
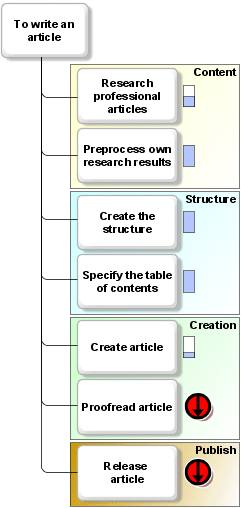
Now it’s time to assign the coverage to every action point. Select the action points one after the other and assign the appropriate value. Of course, the “Release article” object will retain the “Very poor” symbol until last.
Each time you change the value of an object, the symbol placed is updated.
You see, it really is possible to comprehend the status at a glance and without tedious text interpretations.
Of course, it is also possible to import your own symbols and use them as attribute symbols.
Alright, now it’s your turn to use attribute symbols by yourself to accelerate the information content.
I’m sure you will find sophisticated solutions using the attribute symbols – in association with scripts, macros, etc.
Note: This article describe a feature introduced or extended with ARIS Platform 7.1 Service Release 5. See this post for links to similar articles.
Fritz,
this is great!
Excuse, if I appear like the fisherman's wife in the German fairy tale. But is there a chance to configure which (model) attributes are displayed in the Architect's / designer's treeview (i.e. to use the feature you described not only for objects within models but for models in the treeview)? Or is the "name" attribute (and the model type) the one and only possibility?
E.g. it would be great to provide rapid overview by displaying sort of status icons with each model. A simple use case would require to assign dedicated icons for each user so that the icon of the user who last modified a model becomes transparent via her icon next to the model. Or, more advanced, I would like to have an attribute that reflects the line count of the model attribute "modeling audit trail" (e.g. less than 10 lines, between 10 and 20 etc.). This attribute could be filled via a macro. And the result is rapid information on the modification cycles the models went through.
Hi Stefan,
good idea to visualize states in the tree views. Currently the tree views do not display attributes of models and objects except the names, the types, and the preview symbols. So the attribute symbols can only be used in models.
At least, in addition to the article, attribute symbols can be used to visualize model attributes as well. The placement is a little different to the placement of object attributes:
1. Click on Insert/Model attribute or on the corresponding icon in the toolbar.
2. In the model window, click on the appropriate position. The Model attribute properties dialog opens.
3. In the Contents field, select the new created attribute.
4. In the Font group box, activate the As symbol check box.
5. Close the Model attribute properties dialog by clicking on OK.
The model attribute is placed. Now your settings are visualized graphically by selecting the different model attribute values.
Bye


